
Google rolled out Project Treble a couple of years ago with Android Oreo. This made it mandatory for devices shipping with Android Oreo and above to be compatible with a generic system image of basically stock AOSP Android. It certainly helped many developers create custom ROMs for certain devices more easily but little did anyone realize Google could jump into the game too. Google now officially supports GSI and allows you to install Android Q on any Project Treble compatible device.
The GSI has the advantage of being straight from Google, so you are not dependent on a custom ROM developer for updates. And you’ll always be able to install the latest stock Android officially from the maker of Android. On many aging phones switching from a heavy custom OEM skin like MIUI or OneUI to stock Android does wonders in terms of performance.
Warning
Installing a custom firmware on your device requires unlocking the bootloader which generally voids its warranty. Even though the GSI is from Google, your phone is not, so installing a GSI is still not officially supported or appreciated by your device’s OEM. So yes, even installing a GSI from Google will absolutely void its warranty unless your OEM explicitly states otherwise, like OnePlus.
We can assure you that the method mentioned below has been successfully tested and that it works perfectly fine. What we can not assure you of is that everything that you do (even if you follow this guide exactly) will produce the desired result. That is to say, there’s always a risk that something can go wrong. In which case, you must understand that you were warned, and you still went with it anyway. Therefore, DroidViews cannot be held liable for any damage to your device.
Android Q itself isn’t official yet and Google is still testing it in beta even on Google Pixel devices. So do expect a lot of bugs because that’s what you’ll get. This Android Q GSi can in no way be a daily driver even for the enthusiasts. So install it only on a device that you know you don’t need to rely on much. Consider this more of an experiment than anything else, for now.
Also, not all Project Treble compatible devices will absolutely boot with this GSI just yet. It’s worth a shot though if you really want to try and get your hands on Android Q.
Requirements
- Your phone should have originally shipped with Android 9.0 Pie out of the box.
- The phone must be Project Treble compatible/certified.
- You’ll need an unlocked bootloader as well.
- Enable USB Debugging and OEM Unlocking on your Essential Phone if you haven’t already.
- Since a GSI is basically a fastboot ROM, it’s given that you should have a working fastboot connection. That means an unlocked bootloader on your Essential Phone and the ADB and Fastboot drivers installed on your PC. Fortunately for you, we’ve already published detailed guides on how to do just that whether you use Windows, Linux or a Mac.
Download Android Q Generic System Image
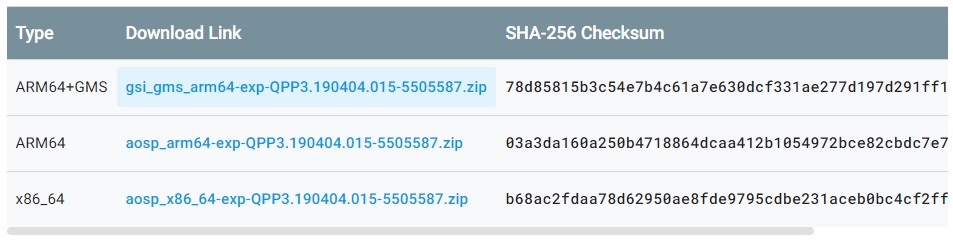 You can download Android Q GSI from Google, following the link provided below. When you get there you’ll find three different device architecture types to choose from. Pick the one that corresponds to the specific kind of hardware your device has and download it. Your smartphone should have launched with Android 9.0 Pie as per the requirements. Most of not all smartphones launched with Android Pie are ARM64 devices, using 64-bit architecture.
Moreover, most of you will probably also want to have all the Google apps and services pre-installed like the Play Store. Because to be honest, Android is crippled without them. So you’ll most probably want to download the ARM64+GMS GSI. GMS, by the way, stands for Google Mobile Services.
You can download Android Q GSI from Google, following the link provided below. When you get there you’ll find three different device architecture types to choose from. Pick the one that corresponds to the specific kind of hardware your device has and download it. Your smartphone should have launched with Android 9.0 Pie as per the requirements. Most of not all smartphones launched with Android Pie are ARM64 devices, using 64-bit architecture.
Moreover, most of you will probably also want to have all the Google apps and services pre-installed like the Play Store. Because to be honest, Android is crippled without them. So you’ll most probably want to download the ARM64+GMS GSI. GMS, by the way, stands for Google Mobile Services.
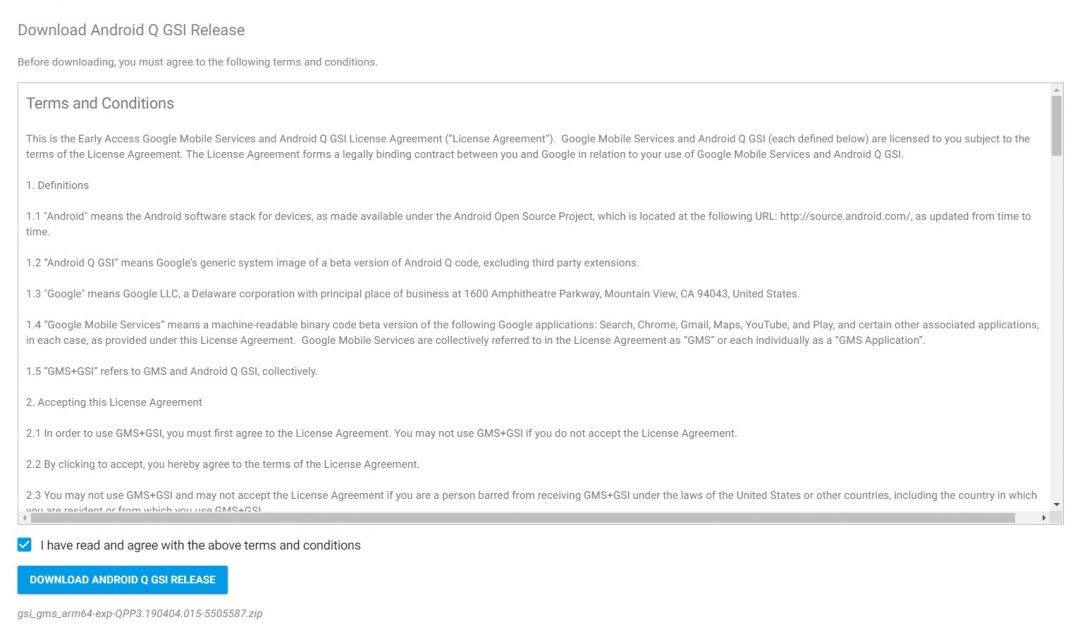 When you click on the download link once you’ve decided which GSI to download, you’ll have to agree to Google’s terms and conditions before you click DOWNLOAD ANDROID Q GSI RELEASE. Once downloaded, extract the zip file and you should get two image files: system.img and vbmeta.img.
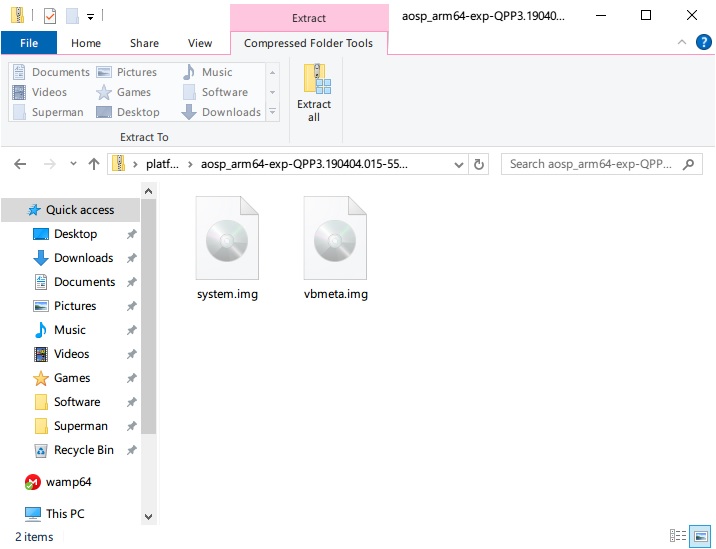
How to install Android Q GSI on any Android
To install Android Q GSI, follow the steps given below:
- Connect your device to your PC with a USB cable and launch the adb command prompt or terminal from the platform-tools folder.
- Next, reboot your device into fastboot mode with this command.
adb reboot bootloader
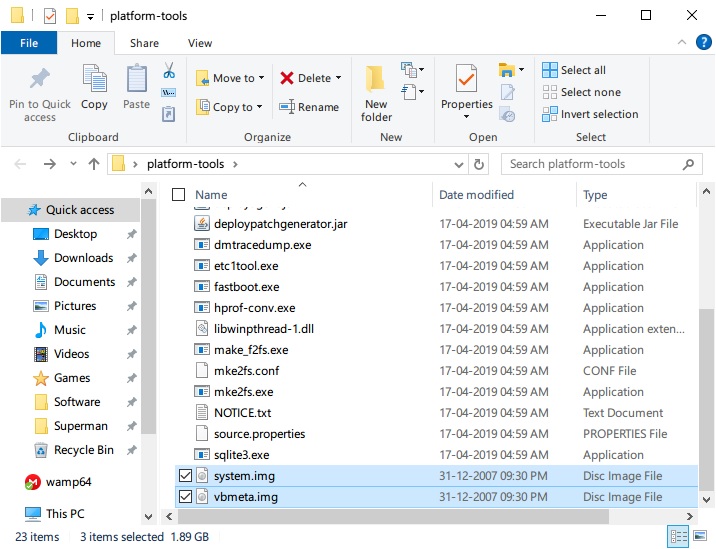
If this is the first time you’re using ADB with your phone, you will have to grant ADB debugging permissions to the computer on your phone before you can proceed. A pop up for the same should soon appear as soon as you launch ADB or right after you enter the command above. - Copy or move both the extracted image files (system.img and vbmeta.img) to the platform-tools folder.
- Once the files are in the folder, use the command below to flash the ‘vbmeta’ image.
fastboot flash vbmeta vbmeta.img
- Next, wipe the system with this command.
fastboot erase system
- Finally, flash the system image containing Android Q.
fastboot flash system system.img
- Once that is done, factory reset your device with the command below. This will wipe all your data.
fastboot -w
- Disconnect your phone from the PC and press and hold the power button to reboot it or just use the command below, without disconnecting.
fastboot reboot
When your device boots, and if it does, you should be greeted with the Android Q set up wizard.
Đăng nhận xét
Vui lòng gõ tiếng Việt có dấu. Không nói tục chửi thề 🤬